Principal path =Home>Beadmaking & Materials>Organic Materials> Beads and Seashells
Turning a Shell into a Bead
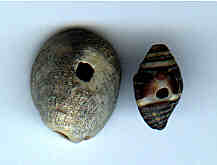
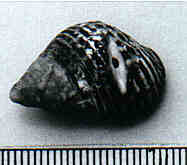
As you go through this gallery, you will have noticed that there are several ways to turn shells into beads. Some shells (most notably the tusk shells) are natural beads because they already have holes in or through them. Some, including the popular cowries and Conus shells need a lot of work, including smashing and grinding. Others need only simple holes.
While some beadmakers today use small electric drill on their shells, this doesn't work too well because it often shatters the shell. Most people who make beads from shells use methods that have been employed from the beginning.
|
I have studied the problem of how to turn a shell into a bead for many years. My conclusions are based on examining many shell beads from excavations and by experimenting. I carried out these experiments using prehistoric stone tools. As I conducted them I timed myself to determine which methods were most efficient.
Of the various ways to perforate shells, combinations (hammering and grinding smooth or grinding thin and gouging) were most common and most efficient. To grind off the back of a cowry took me 25 minutes, but by hammering the back and grinding it smooth, it took only 6:16 minutes (and seconds) and I had a larger hole. A combined approach has other advantages with other shells, too. Gouging a hole is efficient, but only works with thin shells. It is possible to hammer a hole into a shell, but you must be careful not to break it. A combination of grinding and gouging, however, gives you a quick hole, though often jagged at the edges.
Two other methods found on ancient shells work but are very time-consuming. One is to saw a hole into a shell with a stone blade. I used several blades. On a relatively thin Nerita it took me 12:30 and on a thicker Pomatius 39 minutes. It is laborious, but it leaves a nice hole. The other method was just to scratch continually at one spot. As I worked this way I was continually tempted to deepen and enlarge the hole by twisting my hand. I can see how it might have led to the invention of rotary drilling.
|

__________________________________________________
Small Bead Businesses | Beading & Beadwork | Ancient Beads | Trade Beads
Beadmaking & Materials | Bead Uses | Researching Beads | Beads and People
Center for Bead Research | Book Store | Free Store | Bead Bazaar
Shopping Mall | The Bead Auction | Galleries | People | Events
The Bead Site Home | Chat Line | Contact Us | Site Search Engine | FAQ